In this article we will first discuss the case for and against using Word as your HTML editor. Then we will see how to properly save a Word file to smaller, more compact HTML files. Third and last, we will see how to do this through code, and create a batch process for converting numerous Word files to HTML.
The case for and against Word as an HTML editor
Microsoft has given us the ability to save a Word file as HTML for many of the latest editions of Office. It’s a very easy process, and many use this way of creating HTML pages because:
- They are already familiar with Word and its formatting features.
- Word comes installed on their computer, and they do not want to purchase additional HTML authoring software.
- They have numerous files in Word format that they want on a website in HTML. Simply exporting them to HTML is the fastest way.
Unfortunately, there is a downside to this method: Word does a terrible job of creating compact, cross-browser HTML source code. If this is important to you, then you should probably stay away from using Word as your HTML editor in the first place. However, having said this, it is still possible to clean up the generated code quite a bit, first through Word itself and second through other tools or custom Regular Expressions.
Saving as HTML from Word
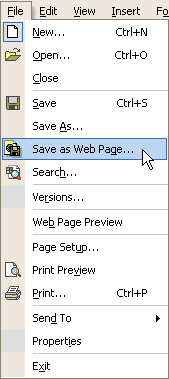
Start by opening an existing Word file on your system, or by creating a new one and typing in some text and pictures. Then click on File > Save as Web Page…

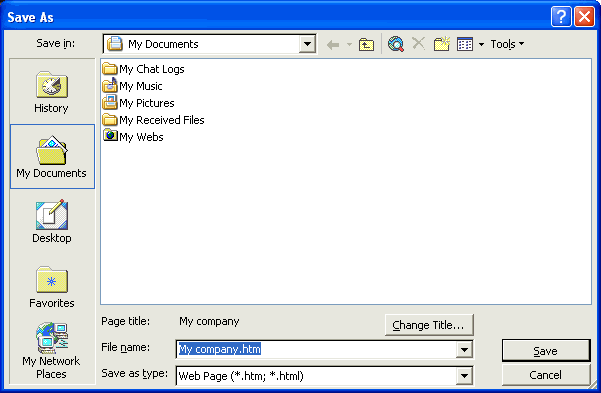
Doing so, Word will display the Save As dialog box.

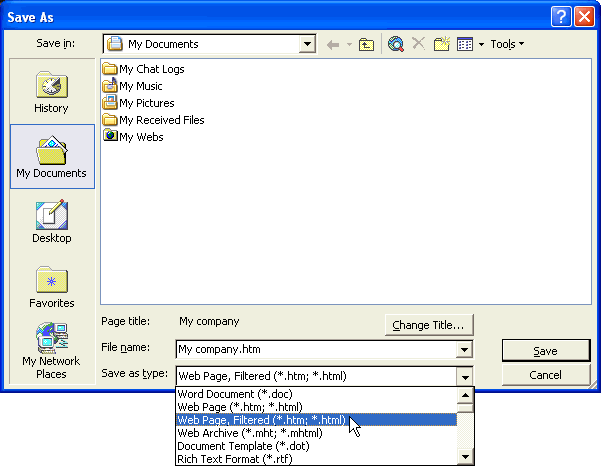
We can see that Word took the filename of the DOC file (for any new files it creates a filename based on the title of the document) and is prompting us to save it with the extension .htm. This is clearly shown by the select box labeled Save as type which has Web Page (*.htm; *.html) already selected. We can now perform the normal save operations, like choosing the name and location of the HTML file. However, Word has a save option called Filtered HTML which greatly reduces the HTML code produced.

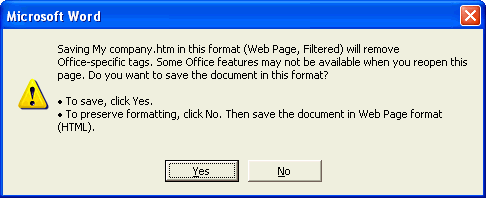
It’s important to understand the difference between the two options. When Word saves a file as HTML, it still wants to be able to open it back in Word and maintain the same formatting as when you created it. The way it does this, is by leaving a lot of Word propriatory code inside the generated HTML file. If however, we simply want to export our contents to the smallest HTML file possible, without needing to re-open them back in Word, we can choose the Filtered HTML option. This produces smaller files, less HTML code and, even more important, a better cross-browser compatible source code. When you select this option and click on Save, you will get a popup which will alert to this fact.

Click on Yes to finish the process. Something else worth noting happens here on save. Suppose you have some images embedded inside your Word file. These images could be GIFs, JPGs, BMPs, PNGs, etc. When you insert an image in Word, the image file is actually embedded inside the file and is saved along with it. When we save the file as HTML, Word exports all these images to a folder that it creates in the same location as the exported HTML file, and then generates links to them inside the HTML code. The exported images are handled like so:
- They are reduced/increased in size depending if they were decreased/increased in width and length inside Word.
- They are converted to GIFs and JPGs.
- Their names stay the same.
- The name of the folder that they are stored under is the name of the HTML file that is created, plus the extension “_files”. For example, if the filename is “My company.htm”, then the images will be under the folder “My company_files“.
- The link inside the HTML file to the images is relative. For example, <img src=”My company_files/house.gif”>.
Exporting to HTML through code
Let us assume that we have a bunch of Word files sitting inside a directory, and they all need to be converted to HTML files. We can open each one and follow the procedure above, but that can take a long time, depending on how many of them you have. We can instead, use a little WSH scripting to do this for us. The idea is the same: create an instance of the Word application, loop through the folder, open each DOC file that we find, export it as Filtered HTML, close the file, move on to the next, and finally close the Word application object. Let’s first look at the code needed to do this with WSH VBScript, and then we will break it down.
Save the following code as a vbs file (for example, createdoc.vbs) somewhere on your system. Before you use it, you must change the 2 constants folderToScan and folderToSave. These folders reflect which folder to look in for any Word files and which folder to save to. Once you edit these 2, double click on the vbs file to run it.
The code scans through the folder defined in folderToScan. After a simple check to see if the folder exists, it creates an instance of the File System Object, maps to this folder and puts all the files under it in a collection. It then creates an instance of the Word application, and loops through the files in the collection. For each Word file that it finds, it opens and saves it as Filtered HTML. If you now look inside the output folder, folderToSave, you will see the newly created HTML files with their corresponding directories of images.
The constant wdSaveFormat is a unique number that specifies an external file converter. Setting it to 10 creates Filtered HTML files. For regular HTML output use the number 8. This will produce bigger HTML files but will maintain the Word formatting.
Great script! Very professional and well documented.
Although, I found one bug on line 64. Just added a backslash after folderToSave. The way it was, tha last directory of the folder name becomes part of the name of the file.
64. oDoc.SaveAs folderToSave & “\” & curFileName & “.htm”, wdSaveFormat
It becomes perfect to me when I changed line 54 to allow docx files also.
54. If (objFso.GetExtensionName(curFile) = “doc”) Or (objFso.GetExtensionName(curFile) = “docx”) Then
Thank you. It just solved a great problem to me. I had tryed to do this before, but my skills were not enough.
I missed rss to add this site on my favorite list.
@Marco Antonio:
Doesn’t adding the slash or not depend on how you define your folder in line 22? In my case, the variable “folderToSave” was defined as “C:\Inetpub\wwwroot\word\” (notice the last slash), so I don’t need to add another one on line 64 like you suggest. Double check your variable and how you define your folder and let me know if it still doesn’t work for you.
Great addition of the DOCX document type! I only had DOC files to parse out when I wrote this, but it’s certainly nice to have in there.
Here’s the link to the RSS:
https://evagoras.com/feed/
Hi, Evagoras!
This is a great article, as it clearly explains the problems and demonstrates a solution, showing every step and what to expect on-screen. Thank you for the effort you took to write so well. 🙂
Could you tell me, please, which versions of Word can output Filtered HTML?
Regards,
Yahya
Wheelers Hill,
Victoria,
Australia
@Yahya Abdal-Aziz
I think the version I first tried this trick on was Word 2007. I assume every other version since then will have kept that feature, but I am not sure how far back this goes. Perhaps the 2007 is the first to offer this. Maybe a Word pro who reads this can verify?
Hello Evagoras,
I was having a problem with the images disappearing when i converted my word doc to html. They are showing up now when i used the Filtered settings. Not sure why that was happening. I am new to this, could you please tell me a good html editor that i can use instead of word ?
Thanks,
T
I am glad you got it working in the end. There are so many free and paid good HTML editors that I wouldn’t know where to begin! You could try Dreamweaver by Adobe, Expression by Microsoft, iWeb from Apple, or just Kompozer which is free. A quick search in Google for “good html editors” will reveal a plethora of choices for you to pick. My HTML editor of choice is Eclipse.
Hi Taher,
i also experience the problem of missing images. more precisely, the images are replaced with empty gif counterparts of the same dimensions as the originals. The conversion works when launching the script from the cli but fails when called programmatically.
Have you (or anyone else reading this) gathered more information on the issue or do you ave any idea how to get rid of the behaviour ?
Thx in advance and best regards, Carsten
Many thanks Evagoras,
Great code, exactly what I needed and so well explained.
Chris
Thank you very much Sir!
Just what i need at the moment 😀
somehow, When it finish converting, A lot of ‘looks-like-junk-file’ is created with a filename start with ~$.
I have never run into that situation before. What version of Word files are you trying to convert? Do they contain anything else other than text and images?
Just wanted to say a quick thanks for the very clear explanation.:)
Thank you – just what I needed. Thanks to your well documented code, I was very easily able to modify the script to reverse the process (i.e. convert from HTML to .docx). Thanks again.
This script has been very helpful and several occasions.
Is there any way to get this script to traverse down through subfolders in the FolderToScan?
C:\Word\documentation\
C:\Word\documentation\SubFolder1
C:\Word\documentation\SubFolder2
C:\Word\documentation\SubFolder3
C:\Word\documentation\SubFolder4
I have doc and docx files scattered through a huge file folder structure and don’t want to have to update the FolderToScan definition for all of those. What about naming multiple FoldersToScan? I’m okay with the FolderToSave being a single folder for outputting the filtered HTML.
Thanks…