In this article we will see how to create a dynamic folder tree control of your website’s folders and files. It uses ASP, XML and DHTML and by simply copying it to your site you have an instant cross-browser, Windows Explorer-like navigation of the contents.
Features:
- cross-browser compatible (NS4.x, NS6, IE4.x, IE5.x, IE6.x)
- fast rendering
- ability to refresh it at demand as changes are made to the file structure
- easily customizable to include/exclude properties/nodes
- control over what nodes to leave closed on loading for better performance
It is recommended, but not necessary, that you first read Generating an XML file of your website’s folders/files, as well as Sam Reynoso’s excellent article Enhancing the Dynamic Tree Menu System, which shows the logic used for displaying the Menu Tree. For this reason, I will only go through the changes needed to make this work. In the downloadable materials though, you can find the full source code.
To make this work for you
- Create a folder in your website where you will copy all the code needed. You can name it whatever you like. I called mine navigation.
- Download the zip file (top right-hand “Page Options” box) containing all the source code, and unzip it in your newly created folder.
- Run the createxml.asp file to create the XML file of your site’s contents.
- When that is done, you can navigate to the default.html file which will render the Menu Tree.
| Files needed and what they do | |
|---|---|
| createxml.asp | Traverses the file system of your website and creates an XML file of the contents. |
| aspRoutines.asp | Loads the XML file and parses it out writing the HTML code for the Tree. |
| default.html | Frameset of the left and right frames for viewing the Tree. |
| menu.asp | Left frame of the frameset. Calls the aspRoutines.asp functions. |
| content.asp | Right frame of the frameset. Accepts parameters sent from the links in the left frame and performs customized actions. |
| /images | Folder where all the images reside for properly displaying the Tree. |
| functions.js | Javascript functions to create the DHTML behaviors. |
| style.css | Stylesheet for the Tree. |
| menuitems.xml | XML file of the site’s contents. Generated by createxml.asp. |

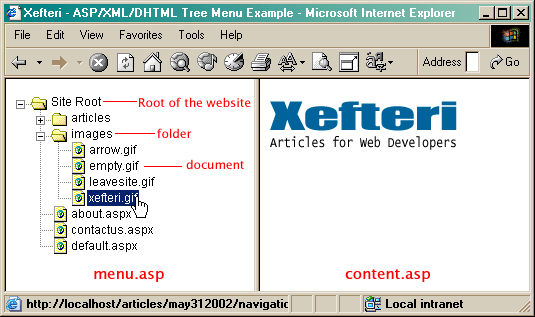
Above is a snapshot of a typical example. The Tree Menu will show up in the left frame, while the right frame is reserved for sending the path of a folder/file to it and executing some action based on that. For example, if you are creating a content management system, you might actually open up text documents for editing and display contents or properties of a folder. In the materials available for download, I simply redirect to the document and display the folder path passed. Clicking on a folder icon will expand/contract to reveal the folder’s contents.
Creating the XML file
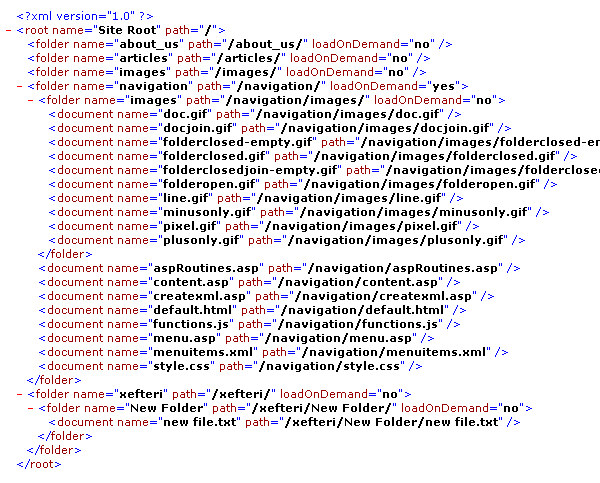
The XML file is created by createxml.asp. The output of the XML file will be a little different this time from my previous article. This is an example of what it might look like eventually:

There are 3 main elements to this file:
- node name is either root, folder or document.
- name attribute is the OS name of the folder/file.
- path attribute is the virtual path of the folder/file.
There are some slight differences between this createxml.asp and the one in the previous article. Specifically:
Changes:
- Addition of the xml version declaration in the XML file.
- Change of location where the XML will be saved to.
- There is no attribute type anymore (of root/folder/document). The node name is obvious enough and there is no need to repeat it.
- name attribute replaces the old value attribute.
- path attribute replaces the old url attribute.
- A new function fnLoadOnDemand which goes along with the attribute loadOnDemand in each folder node.
The new function fnLoadOnDemand controls whether a particular node’s children will be loaded in the resulting menu or not. It accepts the folder path as a parameter, and if it returns yes, it will load the folder’s children, while if it returns no then it will not load them. This helps in deep sites where it takes a long time to render the menu tree. Customize this function to get the results you want. For example, I excluded the folder navigation manually by hard coding it in an IF statement. You might decide that your validation is to check how many files exist under a folder, and if there are let’s say more than 30, then output a no.
Loading the XML file
This is done through a function called fnLoadXMLData in the aspRoutines.asp file. This file has only one change from the original: the way we load the data to be parsed. In our case, we are loading it from the XML file /navigation/menuitems.xml.
We create an instance of the MSXML component and load the menuitems.xml file we just created into it. If we encounter any errors, we output them appropriately.
Generating the HTML
Once the file is loaded, we call the sub DisplayNode, which is responsible for traversing the XML tree and properly displaying each menu item. This routine calls itself recursively and generates an HTML page containing javascript that handles showing/hiding the menu items. This sub is also in the aspRoutines.asp file.
Changes:
- sNodeType, sAttrValue, sURL are now capturing different attribute names – but they are still used the same way.
- The path of the folder/file is now passed to the page content.asp file in the QueryString.
- The sMode is now dependent on the folder node attribute loadOnDemand. If the value is yes, then the children will not be loaded unless that folder is clicked.
The best use that I can think of for something like this is a Content Management System or a Web-based File Manager. If you use it for this purpose, you can add some code that calls the createxml.asp file whenever you make a change to the filesystem, and then redirect to the default.html, so that the Menu reloads and the file changes are reflected in the Tree.